Connecting to MEGA MEGA Windows Front-End
MEGA Windows Front-End is the MEGA application accessible via the Windows desktop.
To simplify your first steps with MEGA, this guide is based on examples available in the "MEGA (Tutorial)" repository of the "Demonstration" environment. The "Mister Guide" user has been installed to guide you in your discovery of MEGA.
To start MEGA:
1. Double-click the MEGA icon  .
.
.The connection dialog box appears.
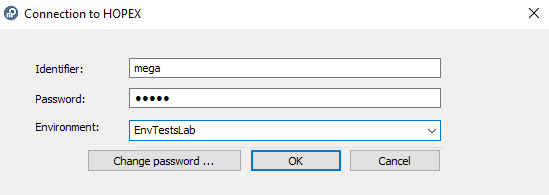
2. In the Environment field, select your work environment.
3. In the Identifier field, enter your identifier.
4. In the Password field, enter your password if necessary.
5. Click OK.
When you have been authenticated, the workspace selection dialog box appears.

The Person field is defined automatically; it indicates the name of the person associated with the identifier defined in the connection dialog box.
6. In the Repository field, select your work repository.
 opens the list of repositories available in the environment. Before you begin modeling the data of your company, it is recommended that you create a new repository in a new environment.
7. In the Profile or Business Role field, click the arrow and select the profile or business role with which you want to work.
8. Click OK.
Your desktop appears.