Switching Between Profiles
In your HOPEX desktop, you can easily switch to another profile without logging out from HOPEX.
To switch to another profile without logging out from HOPEX:
1. In your HOPEX desktop, click Main Menu  .
.
.2. Click Change profile and select another profile.
3. Select your desktop exit mode:
• Yes
Modifications you have made in your private workspace are saved in the repository.
• No
All the modifications you made since your last dispatch (private workspace) / save (public workspace) will be lost. You can use this option if you want to view data quickly and exit without impacting the repository.
• (Private workspace specific) Later
You work is kept, but other users are not yet seeing the changes you made.
The desktop associated with the selected profile is displayed.
Customizing Your Personal Parameters
In your HOPEX desktop, you can customize your personal parameters:
• modify your password
• modify the image of your avatar
Modifying your Password
Your password must contain at least 8 characters and be complex enough to meet your enterprise security requirements.
A colored progress bar (red, orange, green) indicates your password complexity level as you type.
To modify your password:
1. In your HOPEX desktop, click Main Menu .
.2. Select Settings > Modify Password.
The Change password window is displayed.
3. Enter your former password.
 .
.4. Enter and confirm your new password.
5. In the Security question field, select a security question.
6. In the Answer to question field, answer the selected security question.
to check your answer.7. Click Apply.
Your modified password is saved but is not taken into account until you dispatch your work.
Modifying your avatar
The Main menu is represented by your avatar. You can modify it by downloading an image in ico, bmp, gif, or png format up to a size of 30 MB.
is represented by your avatar. You can modify it by downloading an image in ico, bmp, gif, or png format up to a size of 30 MB.To modify your avatar:
1. In your HOPEX desktop, click the Main Menu .
.2. Roll the mouse over your avatar.
Your avatar appears in edit mode  .
.
3. Click your avatar.
The selection of a file dialog box opens.
4. Click  .
.
.The selection dialog box of the file opens.
5. Click Browse and select your image.
6. Click Upload.
The image file to be downloaded is defined.
7. Click OK.
The image of the Main Menu is replaced by your image  .
.
is replaced by your image Your avatar is updated.
Resetting Your Desktop Customizations
In your HOPEX desktop, you can reset your personal parameters. This includes customization of your desktop, such as for example:
• your home page customization:
• adding tiles
• tile size
• arranging tiles
• your dashboard customization:
• adding widgets
• your customization of columns in lists:
• displaying/hiding columns
• column width
• column order
• grouping columns
• locking columns
• your customization of windows in the desktop:
• window size
• reducing the navigation panel
This does not impact customizations that concern the repository, such as for example:
• customizing your avatar
• managing your alerts
• the data language and the interface language
• your password
• your options
To reset your customizations:
1. In your HOPEX desktop, click the Main Menu .
.2. Select Parameters > Reset personal parameters.
Your customization of your desktop will be reset on the next connection.
Setting a Current Library
A library is used to represent a work context.
In your HOPEX desktop, when you set a current library, by default all the objects that you have created are contained in this library.
When a library is set, if needed, on creation of the object you can modify the library that contains it.
Defining a current library prevents the existence of isolated objects and facilitates exporting objects in a given context.
If the administrator has defined a default library for you (user level), this also defines your current library.
To set a current library:
1. In your HOPEX desktop, click the Main Menu .
.2. Select Set Current Library.
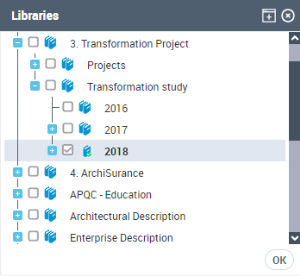
The library tree window appears.
3. Select a library or a sub-library.
 to indicate that a sub-library is selected.