Extracting the Description of a Database
The extraction utility is designed to run on a workstation that does not have HOPEX installed. You can then transfer the results to a HOPEX workstation for reverse engineering. It can also be used for generation in modification mode.
In order to extract the data, the workstation must be connected to the database using ODBC protocol (see the installation documentation for this product). The database driver must have a conformance level of 1 or higher.
To install this utility, simply copy to a directory the files mgwdbx32.exe and mg_dbex.dll. If it does not exist, the file ODWDBEX.INI must be created.
The extraction utility can be installed independently of HOPEX Information Architecture.
To extract the description of a database:
1. In the HOPEX installation folder, under the "Utilities\MEGA Data Extractor" folder, run the mgwdbx32.exe extraction utility.
2. Connect to a data source by clicking Data Source > Connect.
The Data Sources dialog box opens.
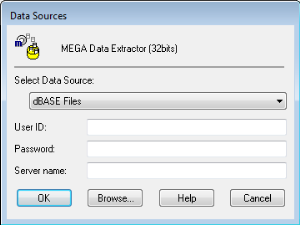
The drop-down list shows the ODBC connections.
3. Use the Browse button to access the ODBC manager to define a new data source or install a new driver.
4. Depending on the connection, you may need to specify a User ID, a Password, and a Server Name. If other parameters are required by the ODBC manager, you will be prompted for them when the connection is established.
5. Confirm the information entered by clicking OK.
A green light indicates that the connection has been established. Otherwise a message appears if the connection has not been correctly established. In this case, check the data source definition.
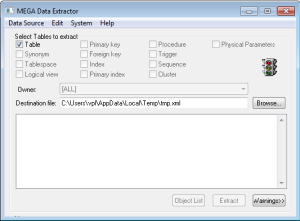
Once the connection has been established, select the desired extraction options.
6. Select the elements to be extracted in addition to the tables and columns. By default, all of these elements are selected.
All the accessible tables are displayed, whether or not you are the owner. Synonym tables can also appear if you select the corresponding check box.
To view only those tables belonging to a specific Owner, select the appropriate owner from the drop-down list. It may take a few seconds for the list of owners and their tables to appear. Table extraction takes a few minutes.
The following elements are included in the extraction:
• Primary keys (Primary keys).
• Foreign keys (Foreign keys).
• Index (Index): these are indexes that do not use primary keys.
• Primary index (Primary index): these are indexes that do not use primary keys.
The Destination file field specifies the name and path of the extraction file; use the Browse button to specify its location.
7. After selecting the extraction options, click the Extract button to begin the extraction.
A message reports the number of tables extracted. You can select the Warnings button to view the report file.
You can view the list of accessible tables by clicking the List Tables button, and then select specific tables from the list for extraction (all tables are selected by default).
8. On completion of extraction, select Edit > Report file to consult the report, or Edit > Extraction file to consult the result.
The results file can then be transferred to a workstation that has HOPEX Database Builder where reverse engineering can be performed (see "Reverse engineer tables", page 149). It contains a database description in the form of HOPEX objects.
When the extraction operation has been completed: