Preparing Tests
Supervision of test progress is assured by the lead controller. In the test preparation phase, he/she establishes the work program and assigns activities to controllers.
Work program creation prerequisites
So that the work program can be generated:
• processes (organizational or business) must be connected to the entity
• controls must be connected to processes
Work program content
HOPEX Internal Control enables automatic creation of a work program structure from:
• the tree of processes connected to the entity, or
• the processes specified in the test scope
|
Environment objects
|
Objects created in the
work program
|
|---|---|
|
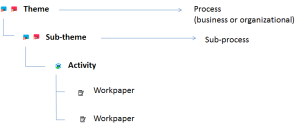
Process (organizational or business)
|
Test theme
|
|
Control (connected to process)
|
Test activity
|
Test theme
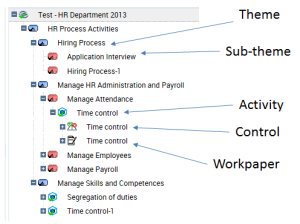
A theme corresponds to a process.
Themes can be used to group test activities and workpapers, that is to organize test content.
Test activity
A test activity corresponds to a control.
It is the basic element of the test. It enables assignment of responsibility to the controller.
Workpaper
A workpaper comprises points to be checked on a given subject in the course of an audit or test activity.
A workpaper is generated for each generated test activity. For more details, see Creating workpapers.
Creating work programs automatically
To create a work program automatically:
This command will duplicate the tree of processes for the entity in the scope of the test.
If processes are explicitly specified in the test scope, only these processes will be automatically generated in the work program structure.
Completing the work program manually
The lead controller can complete the test manually to specify its content. He/she can add or remove themes/activities in the Work Program tab of the test.
Creating themes
To create a theme:
1. In the properties of a test, select the Work Program tab.
2. Click the icon of the test and select New > Test Theme.
The theme created appears in the tree of the work program.
3. Display properties of the theme.
You can:
• modify its name
• select a parent test theme (if you want to create a tree of themes)
• connect the test theme to a process
• enter a comment
4. Click OK.
You can view the tree of themes and sub-themes created. You can now create activities and workpapers.
Creating activities
A test activity is a test element relating to a control.
To create an activity:
1. In the properties of a test, select the Work Program tab.
2. Click the icon of the test (or theme) and select New > Test Activity.
The activity created appears in the tree of the work program.
3. Display properties of the activity.
4. Enter the name of the activity.
5. Connect the activity to a Theme if you want the activity to be located under a theme in the tree.
6. Connect the test activity to a control.
7. Select the Owner of the test activity, who can be a controller or the lead controller of the current test.
8. Indicate the Estimated Workload.
9. Click OK.
Assigning activities
For each activity, the lead controller specifies:
• Start and end dates
• Estimated workload
• Controller responsible for execution
To enter this data:
1. In the properties of the test, select the Activities tab.
2. Open the properties of the test activity concerned.
3. In the Test Activity Owner field, using the right-pointing arrow, select a controller from among the candidate controllers.
4. Enter test activity start and end dates.
5. Specify the workload.
Reviewing the work program
The lead controller can proceed with a report on the work program. This report enables a check that:
• task assignment has been correctly carried out
• the work program covers the appropriate risks and processes
Consulting the work program report
To access work program reports:
You can view:
• comparison of resources allocated and resources available:
• workload (in person/days)
• workload by theme (in person/days)
• activities by theme
Exporting the workload under Excel
The work program under Excel covers themes, sub-themes, activities and workpapers.
Having the work program available under Excel allows:
• consultation of the complete work program without having to access objects individually
• storage of a printed version of the work program
• viewing tasks to be executed at indication of an issue
To export the work program:
You can then modify the work program in Excel.
When the work program has been modified, you must create a business document in HOPEX Internal Control and reimport the modified work program.
To create the business document corresponding to the modified work program:
1. In the properties of the test, select the Documents tab.
2. Click the New button.
3. Enter the name given to your work program.
4. Select the location where you stored the modified Excel file and click Upload.
5. Select the "Work Program" document template.
6. Click OK.
The modified work program is now stored in the HOPEX repository.
Validating work programs
When the lead controller validates the work program via the workflow, an assessment session is automatically created and connected to the test. Assessment questionnaires are generated and made available from test activities. Respondents are owners of test activities.
To validate the work program:
Executing administrative tasks
Planning resources
Auditors/controllers can be assigned to different audits/tests at the same time. It is therefore important to enter the time allocated for each auditor/controller to an audit/test.
To indicate for each auditor/controller the time to be allocated to an audit/test:
1. In the properties of the audit/test, expand the Users section.
2. Select a user and in the Workload (Hours), enter the time to be spent on the audit/test.
Creating general tasks
For controllers, the director can create tasks not directly linked to tests.
To create a general task:
1. Select Testing > Preparation > General Tasks.
2. Specify dates and a comment and connect users to this task.
Users assigned to this task can allocate hours to this task in their time sheet.
Validating Vacations
To display vacations in auditor time sheets, you must previously have validated the vacation.
To validate the vacation:
1. Select Testing > Preparation > Vacations and open the properties of the vacation to be validated.
2. Position its status as "Validated".
Initializing expense sheets
The lead auditor can create an expense sheet per auditor/controller for all auditors/controllers assigned to the audit/test. In this case it consists of initializing expense sheets.
To initialize expense sheets:
1. In the audit/test properties window, select the Expenses tab.
2. Click the Initialize button.
An expense sheet is created for each auditor/controller.
To create an expense:
1. In the expense sheet properties, expand the Expenses section and click New.
2. Enter for each expense:
• an Amount
• a Date
• the Expense Category: "Lodging", "Food and Beverages", "Transportation"
• a Comment if required.